Today I’m starting to upgrade my almost 40 Cisco Catalyst 3560G switches to a newer version of the IOS. Since these switches were installed over the course of about 2 years, a lot of them are running different IOS versions, so it’s time to get everything up to snuff and running the same version across the board. The latest version that’s installed on any of them is 12.2(25) SEE3 and according to Cisco support that version is now in deferral and it’s suggested to move to version 12.2(44) SE5. But…that version is also in deferral so the suggested is 12.2(44) SE6. Now at the time of this writing, the latest version is 12.2.50-SE. But I’m going to stick with version 12.2(44) SE6 for now as I’m not one to jump on the latest version of anything unless I absolutely have to.
Downloading the software
As you know, you have to have a Cisco maintenance agreement as well as an online account linked to that agreement so you can legally download the new IOS. So assuming you meet that criteria and have already downloaded your desired IOS, let’s get started on the upgrade process. If you haven’t downloaded the IOS yet, you can do so at http://support.cisco.com
Prepare for disaster
Ok, maybe that title was a little strong. But you need to backup your existing IOS image as well as your current configuration. If something goes wrong during the upgrade, you’ll want to bring things back as quickly as possible.
- So first, let’s run the TFTP server software. I’m using Tftpd32 available for free at http://tftpd32.jounin.net
- Now from the switch CLI determine your current IOS version by typing:
Router# show version
On my switch the version, as mentioned before, is 12.2(25) SEE3.
- Now locate the current IOS image using the dir command as shown:
Router# dir
From here I can see a directory named c3560-ipbasek9-mz.122-25.SEE3 which matches my version number above. Obviously depending on the version of IOS you’re running, this directory name will be different.
- So we now see the directory that contains the current IOS. Change to that directory and issue the dir command again to view the image file name.
Router# cd c3560-ipbasek9-mz.122-25.SEE3
Router# dir
- I can now see the image file c3560-ipbasek9-mz.122-25.SEE3.bin and that’s the file that we want to backup. So with our TFTP program running we have what we need to back up the current IOS. From the switch CLI type the following to start the IOS backup:
Router# copy flash:c3560-ipbasek9-mz.122-25.SEE3.bin tftp
Address or name of remote host []? 192.168.28.1
Destination filename [c3560-ipbasek9-mz.122-25.SEE3.bin]?
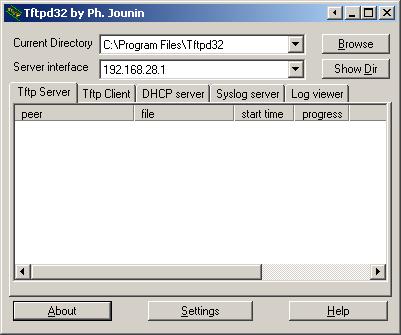
The remote host IP address is the IP displayed in the Server Interface field of the Tftpd32 program. After a little time, the download will finish and you should see a copy of the IOS in the directory shown in the Current Directory field of Tftpd32 as shown in Figure A.

Figure A: You’ll need TFTP software to be able to upgrade and backup your switch.
- Next you need to back up your current configuration as follows:
Router# cd ..
Router# copy flash:config.text tftp
Address or name of remote host []? 192.168.28.1
Destination filename [config.txt]?
Upgrading the switch
So now that we have a good copy of both the current IOS and configuration, we’re ready to upload the new image. I’ve downloaded the tar package named c3560-ipbasek9-tar.122-44.SE6.tar form Cisco and placed it in my Tftpd32 Current Directory location. Also, on my switch I have enough room in flash to leave the current IOS and still be able to upload the newer image. This allows me to specify which image to boot from and test the upgrade before actually removing the older version. If you have the space, I suggest you do the same. It’s just another safety net in case something goes awry. If you don’t have the space, then you’ll have to delete the existing image first before performing the upgrade.
- To start the upgrade, from the switch CLI type the following:
Router# archive tar /xtract tftp://192.168.28.1/c3560-ipbasek9-tar.122-44.SE6.tar flash:
After a few minutes the tar file will complete the upload and extraction and you’ll receive an OK when it has finished. Since I left the original IOS in place, I need to specify which IOS I want the switch to load at boot up. I did so with this command and then saved and reloaded the switch.
Router(config)# boot system flash:c3560-ipbasek9-mz.122-44.SE6/c3560-ipbasek9-mz.122-44.SE6.bin
Router# write memory
Router# reload
Proceed with reload? [confirm]
- Once the switch loads, login and confirm the new IOS version is running.
Router# show version
- Now that the new image loaded successfully, I can delete the older version and remove the boot system command.
Router# delete /force /recursive flash:c3560-ipbasek9-mz.122-25.SEE3
Router# no boot system
And that’s it. The switch has been upgraded, tested, and the older version removed.