If you’re managing your Cisco routers, switches, etc. using local accounts created on each device, you need to read this article. Being relatively new to the Cisco IOS myself, I get excited when I find a time saver such as this. It’s one of those things that I knew could be done, but just never took the time to investigate it. What I’m talking about it leveraging Active Directory as the authentication method into the Cisco IOS. So instead of creating and managing user accounts on the Cisco equipment, you can use the existing user accounts in AD. I’ll start by setting up and configuring the Internet Authentication Service, Microsoft’s version of a RADIUS server, in which the Cisco equipment will use to access AD for authentication.
Setting up the Internet Authentication Service
Windows Server 2003 ships with IAS so all you need to do is install it from the Add/Remove Programs. Make sure to login to the server with administrator privileges and follow these steps:
- Open the Add or Remove Programs applet from the Control Panel.
- Click Add/Remove Windows Components, select Networking Services, and click Details.
- Place a check mark at Internet Authentication Service and click OK, Next, and then Finish.
Now that you have IAS installed, let’s take a look at how to configure it.
Configuring IAS
For my configuration, since I only have two in house people that would require access to the Cisco equipment, I’ve created an AD security group named CiscoAdmin. Any members of this group are granted access to the Cisco devices as well as level 15 privileges. So let’s first start with setting up the Remote Access Policy on the IAS.
- Launch the Internet Authentication Service from the Administrative Tools applet in the Control Panel.
- Select Remote Access Policies from the left pane and right-click the Default policy in the right pane and select Delete.
- In the right pane, right-click select New Remote Access Policy to invoke the Remote Access Policy Wizard.
- Click Next, select Set up a custom policy, type a name for your new policy in the Policy name text field and click Next. I used CiscoAuthentication for my policy name as seen in Figure A:
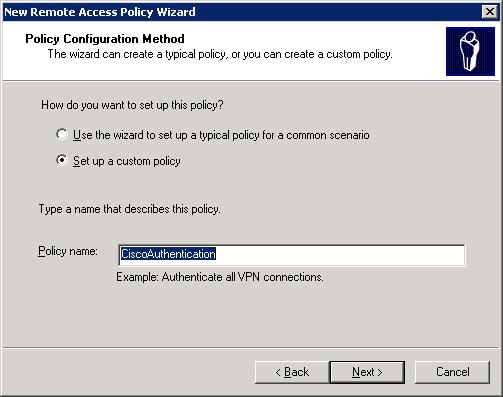
Figure A: Creating a custom remote access policy.
- In the resulting dialog box click Add, select the Windows-Groups attribute type, and click Add as shown in Figure B:
 Figure B: Specify that Windows groups will be used for authentication.
- Next, click Add in the resulting Groups dialog box and select the AD group that will contain the members who will be granted access to your Cisco equipment and Click OK. As mentioned previously, I created a group named CiscoAdmin so that will be the group I’m adding here. Once the group is selected, you’ll see the dialog shown in Figure C:
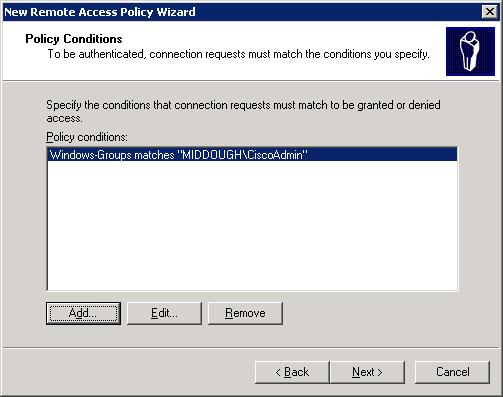 Figure C: Specify the condition to meet to be granted access.
- Now click Next, select ‘Grant remote access permission’, and click Next. On the Profile dialog, click Edit Profile and click the Authentication tab. Now deselect all of the options and select ‘Unencrypted Authentication (PAP, SPAP)’. The Authentication tab should now look like the one shown in Figure D:
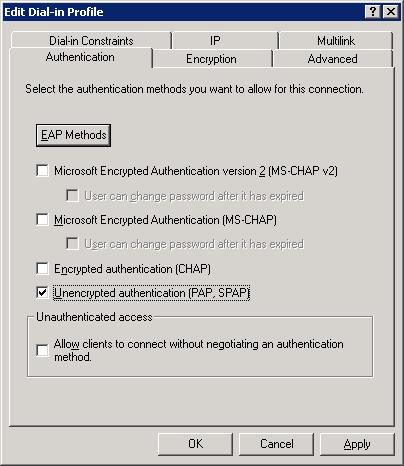 Figure D: Set the Authentication type to only what’s shown in this figure.
- Now click the Advanced tab, highlight the Service-Type attribute and click Edit. Set the Attribute value to Administrative and click OK. Next, select the Framed-Protocol attribute and click Remove. The Advanced tab now looks like the one shown in Figure E: Click Ok.
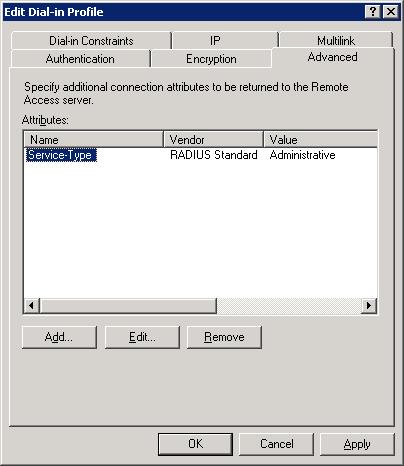 Figure E: Configuring the service type as a RADIUS server.
At this point the system will warn about the authentication method that you’ve selected and ask if you’d like to view the help files for configuration. Click No and continue with the following steps.
- Now click Next and then Finish to complete the new Remote Access Policy.
Adding a RADIUS client
Now that you’ve setup the IAS, you ready to start adding clients. These clients are your Cisco routers, switches, etc that will use the RADIUS box for authentication. In this example we’ll be adding a router with the IP address of 192.168.1.1.
- In the Internet Authentication Service window, right-click on the RADIUS Clients folder and select New Radius Client form the resulting menu.
- In the Friendly name field enter a name to identify your client by. This name can be whatever you want, I’ve chosen to use the host name of the router so I typed CLE_ROUTER.
- Enter the IP address of the router in the Client address (IP or DNS) field. As mentioned previously the IP of my router is 192.168.1.1 so that’s what is entered here. Figure F shows this information entered as described. Click Next to contiue.
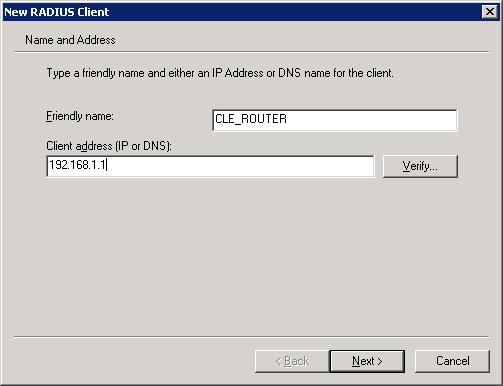
Figure F: Specify a name and the IP of the client.
- In the Client-Vendor pulldown menu, select Cisco.
- In the Shared/Confirm secret fields enter a secret word or phrase using a combination of letters, numbers, upper & lower case, etc and then click Finish. Remember what you type here. This shared secret needs to also be entered into your routers configuration which I’ll cover later in this article. If they don’t match, authentication will fail. For simplicity, I’ve neglected my own advice and just entered ‘stevenson’ as my shared secret. Figure G shows the dialog completed with the vendor and shared secret.
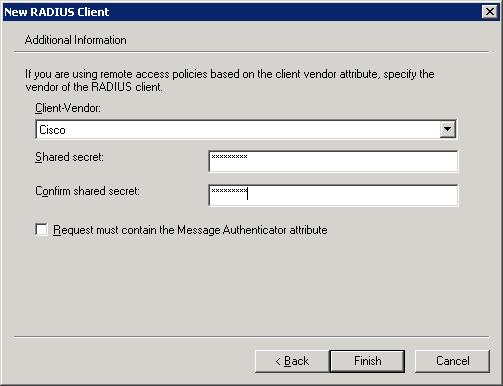
Figure G: Your shared secret must match the shared secret that you’ll enter into your router for authentication to succeed.
That completes the IAS configuration part of the article. Next I’ll show you how to configure the router to authenticate against the IAS server.
Configuring the router for authentication
Before we forge forward, you should make sure that you have a secret password enabled on the router. You should also maintain a local user account on the router itself. That way, you still have a way back into the router if it loses connectivity to the IAS server. Once you have these two items in place, you’re ready for the next step. Enter the following commands into the router configuration:
CLE_Router(config)# aaa new-model
In this line, the IP address is the IP of your IAS server that you configured in the last section. Where you see ‘stevenson’, that’s the same shared secret that we entered when creating the RADIUS client on the IAS server.
CLE_Router(config)# radius-server host 192.168.1.100 auth-port 1645 acct-port 1646 key stevenson
These lines setup the authentication & authorization using the list ‘StevensonList’ which obviously can be named whatever you choose. Notice where you see ‘radius local’. This means access the RADIUS server for authentication but if the server cannot be reached, then use the routers local database for authentication.
CLE_Router(config)#aaa authentication login StevensonList group radius local

CLE_Router(config)# aaa authorization console

CLE_Router(config)# aaa authorization exec  StevensonList group radius local
If you’re using the web interface for managing your router, add these commands.
CLE_Router(config)# ip http authentication aaa login-authentication StevensonList

CLE_Router(config)# ip http authentication aaa exec-authorization  StevensonList
And add these lines for console port access and terminal access.
CLE_Router(config)# line con 0

CLE_Router(config)# authorization exec StevensonList

CLE_Router(config)# login authentication StevensonList

CLE_Router(config)# line vty 0 4

CLE_Router(config)# authorization exec StevensonList

CLE_Router(config)# login authentication StevensonList

CLE_Router(config)# line vty 5 15

CLE_Router(config)# authorization exec StevensonList

CLE_Router(config)# login authentication  StevensonList
And that completes the router side configuration. I’d leave your current telnet/ssh session open and test logging in from a new telnet/ssh using the AD credentials. Once everything seems to be working as expected, save the changes.
If you have over 50 pieces of equipment that you want to authenticate against the IAS server you’ll have to be running Windows 2003 Enterprise Edition or higher. The Standard Edition tops out at 50 RADIUS clients.